Learn how to make a jupyter notebook widget for annotation of atom properties

Annotate molecules using RDKit atom properties
Not so long ago Greg Landrum published a blog post with an example of how the SVG rendering from RDKit in a jupyter notebook can be made interactive. http://rdkit.blogspot.com/2019/08/an-interactive-rdkit-widget-for-jupyter.html I think this was cool and can open up for a lot of interesting applications. Say for example there’s a need for annotation of atom properties of a dataset, if one wants to store e.g. 13C NMR chemical shifts on specific carbon atoms or pKa values directly on the (de-)protonable atoms. At the hackathon at the UGM 2019 I got some time to look further into Greg’s code and made a small extension of it using ipywidgets for jupyter notebooks.
Note: The widget is not compatible with jupyterlab as there currently are some differences with how the javascript works (missing require module or something).
First some imports. In python we can import everything, even antigravity (try it out, it’s an easter egg)
from rdkit import Chem
#from rdkit.Chem import AllChem
from rdkit.Chem import Draw
from rdkit.Chem.Draw import rdMolDraw2D
from IPython.display import SVG
from rdkit.Chem.Draw import IPythonConsole
import rdkit
import time
import pandas as pd
print(rdkit.__version__)
print(time.asctime())
Then we can create the Clickable SVG drawer using a slight modifications of Gregs code from his blogpost.
import ipywidgets as widgets
from traitlets import Unicode, Int, validate
class MolSVGWidget(widgets.DOMWidget):
    _view_name = Unicode('MolSVGView').tag(sync=True)
    _view_module = Unicode('molsvg_widget').tag(sync=True)
    _view_module_version = Unicode('0.0.1').tag(sync=True)

    svg = Unicode('', help="svg to be rendered").tag(sync=True)
    #selected_atoms = Unicode('', help="list of currently selected atoms").tag(sync=True)
    clicked_atom_idx = Unicode('', help="The index of the atom that was just clicked").tag(sync=True)
The first custom class is the python object. I’m not going to use the selected atoms, so I create a property “clicked_atom_idx” and remove the selected_atoms property.
The next is a javascript snippet. It adds a callback to all elements in the SVG that conform to certain ID’s. I’ve commented out the selection logic and also added a line which switches the clicked atom_idx to “event_hack” and then back to the clicked idx. I’ll explain why when we get to the callback.
%%javascript
// make sure our module is only defined
// only once.
require.undef('molsvg_widget');

// Define the `molsvg_widget` module using the Jupyter widgets framework.
define('molsvg_widget', ["@jupyter-widgets/base"],
       function(widgets) {

    // The frontend class:
    var MolSVGView = widgets.DOMWidgetView.extend({

        // This method creates the HTML widget.
        render: function() {
            this.svg_div = document.createElement('div');
            this.el.appendChild(this.svg_div);
            this.model.on('change:svg', this.svg_changed, this);
            this.svg_changed();
        },

        // called when the SVG is updated on the Python side
        svg_changed: function() {
            var txt = this.model.get('svg');
            this.svg_div.innerHTML = txt;
            var sels = this.svg_div.getElementsByClassName("atom-selector");
            for(var i=0;i<sels.length;i++){ sels[i].onclick = (evt) => { return this.atom_clicked(evt) };
                //sels[i].r = sels[i].r*2; #R is read only, set_r?
                //Or regexp the r from the svg and increase the size there.
            }

        },

        // callback for when an atom is clicked
        atom_clicked: function(evt) {
            //alert("  "+evt+"|"+this);
            if(!evt.currentTarget.getAttribute('class')){
                return;
            }
            var satmid = evt.currentTarget.getAttribute('class').match(/atom-([0-9]+)/);
            if(satmid.length >1){
                var atmid = Number(satmid[1]);
                //var curSel = this.model.get('selected_atoms');
                //var splitSel = curSel.split(',');
                //var selItms = [];
                //var idx = -1;
                //alert("|"+atmid+"|"+curSel+"|len: "+splitSel.length);
                //if(curSel != "" && splitSel.length>0){
                //    selItms = Array.from(splitSel).map(item => Number(item));
                //    idx = selItms.indexOf(atmid);
                //}
                //if(idx == -1){
                //    selItms = selItms.concat(atmid);
                //    evt.currentTarget.style["stroke-width"]=3;
                //    evt.currentTarget.style["stroke-opacity"]=1;
                //    evt.currentTarget.style["stroke"]='#AA22FF';
                //} else {
                //    selItms.splice(idx,1);
                //    evt.currentTarget.style["stroke-width"]=1;
                //    evt.currentTarget.style["stroke-opacity"]=0;
                //   evt.currentTarget.style["stroke"]='#FFFFFF';
                //}
                //this.model.set('selected_atoms',String(selItms));
                this.model.set('clicked_atom_idx',"event_hack");
                this.touch();
                this.model.set('clicked_atom_idx',String(atmid));
                this.touch();
            }
        }

    });

    return {
        MolSVGView : MolSVGView
    };
});
ipywidgets are super cool graphical elements that can be added to jupyter notebooks for simple GUI functionality. It’s possible to define output ports, use them in code other places for controlling where the output goes. A lot of elements we use in jupyter notebooks just use the output directly after the cell, but with widget.Output() it’s possible to have a handle of where the output goes (including RDKit molecules and pandas dataframes and such). Lets try it, make an output, print something to it, then from the next cell, use the already defined output.
o = widgets.Output()
display(o)
with o:
    print("Hello RDKittens!")
Hello RDKittens!
Hello RDKids!
Now we can reuse the output in this cell (which will give No output, but use the previous, where the print is appended. Use o.clear_output() to clear it.
with o:
    print("Hello RDKids!")
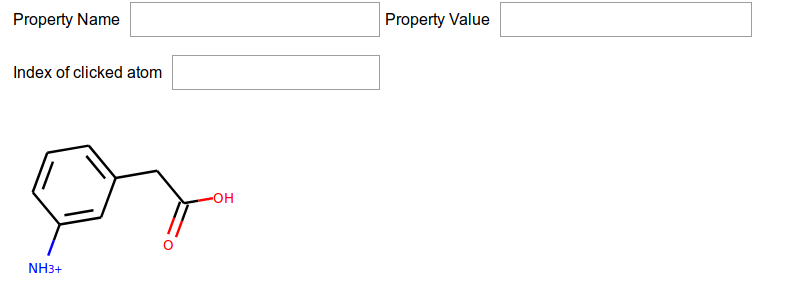
I’ll start by creating a class for collecting the custom widget we’ll be building. I create a set of outputs and some text box elements and displays them in some HBox elements to put them besides each other, as well as an output for the molecule and a table we’ll use later. There’s plenty of graphical widgets to select from here: https://ipywidgets.readthedocs.io/en/latest/examples/Widget%20List.html
class AnnotateMol(object):
    def __init__(self, mol = Chem.MolFromSmiles("c1c([NH3+])cccc1CC(=O)O")):

        style = {'description_width': 'initial'}
        #Create the outputs and widgets
        self.o_mol = widgets.Output()
        self.o_molstring = widgets.Output()
        self.o_table = widgets.Output()
        self.o_atomclicked = widgets.Text(description="Index of clicked atom",
                                         #layout = widgets.Layout(width="100px"),
                                         style=style)
        self.t_propertyname = widgets.Text(description="Property Name", style=style)
        self.t_propertyvalue =widgets.Text(description="Property Value", style=style)
        #Make the GUI

        display(widgets.HBox([self.t_propertyname, self.t_propertyvalue]))
        display(self.o_atomclicked)
        display(widgets.HBox([self.o_mol, self.o_table]))

        #Set the mol
        self.mol = mol

app = AnnotateMol()

Then I’ll add a property for handling what will be done when the molecule is assigned to self.mol. Using @property decorators and a setter enables for some actions to happen. First the private self._mol is set, then we call a method to create Gregs widget and a method that draws is. The create_widget code is more or less cp-paste from Gregs blog-post
class AnnotateMol(object):
    def __init__(self, mol = Chem.MolFromSmiles("c1c([NH3+])cccc1CC(=O)O")):

        style = {'description_width': 'initial'}
        #Create the outputs and widgets
        self.o_mol = widgets.Output()
        self.o_molstring = widgets.Output()
        self.o_table = widgets.Output()
        self.o_atomclicked = widgets.Text(description="Index of clicked atom",
                                         #layout = widgets.Layout(width="100px"),
                                         style=style)
        self.t_propertyname = widgets.Text(description="Property Name", style=style)
        self.t_propertyvalue =widgets.Text(description="Property Value", style=style)
        #Make the GUI

        display(widgets.HBox([self.t_propertyname, self.t_propertyvalue]))
        display(self.o_atomclicked)
        display(widgets.HBox([self.o_mol, self.o_table]))

        #Set the mol
        self.mol = mol

    @property
    def mol(self):
        """Return the private mol"""
        return self._mol

    @mol.setter
    def mol(self, mol):
        """Set the private mol and initalize interactive SVG and update output widgets"""
        self._mol = mol
        self.create_widget()
        self.draw_widget()


    def create_widget(self):
        """Create the interactive SVG mol widget"""
        d = rdMolDraw2D.MolDraw2DSVG(200,150)
        dm = Draw.PrepareMolForDrawing(self.mol)
        d.DrawMolecule(dm)
        d.TagAtoms(dm)
        d.FinishDrawing()
        svg = d.GetDrawingText()
        self.w = MolSVGWidget(svg=svg)

    def draw_widget(self):
        """Display the mol widget"""
        self.o_mol.clear_output()
        with self.o_mol:
            display(self.w)

app = AnnotateMol()

Nice!, now the molecule is drawn. If we change the molecule on the app, the @mol.setter will know what to do, so the next line updates the app, with a new molecule.
app.mol = Chem.MolFromSmiles("C1CCCCC1-c1ccccc1")
But nothing happens, when we click the molecule. Wasn’t that the whole point? Yes, so we need to add an observer that can handle what to do. The observer watches the property “clicked_atom_idx”, and will call the self.on_atom_clicked with the event information. We just need the new value. If the value was not changed, as will happen when the same atom is clicked again, the observer will not do anything, which is why I toggle the value to “event_hack” and back in the javascript and guard against it in the call_back function. We also add the create_observer function to the mol.setter callback so that it is added to the self.w widget. If you know a better way to capture the event, please let me know in the comments.
class AnnotateMol(object):
    def __init__(self, mol = Chem.MolFromSmiles("c1c([NH3+])cccc1CC(=O)O")):

        style = {'description_width': 'initial'}
        #Create the outputs and widgets
        self.o_mol = widgets.Output()
        self.o_molstring = widgets.Output()
        self.o_table = widgets.Output()
        self.o_atomclicked = widgets.Text(description="Index of clicked atom",
                                         #layout = widgets.Layout(width="100px"),
                                         style=style)
        self.t_propertyname = widgets.Text(description="Property Name", style=style)
        self.t_propertyvalue =widgets.Text(description="Property Value", style=style)
        #Make the GUI

        display(widgets.HBox([self.t_propertyname, self.t_propertyvalue]))
        display(self.o_atomclicked)
        display(widgets.HBox([self.o_mol, self.o_table]))

        #Set the mol
        self.mol = mol

    @property
    def mol(self):
        """Return the private mol"""
        return self._mol

    @mol.setter
    def mol(self, mol):
        """Set the private mol and initalize interactive SVG and update output widgets"""
        self._mol = mol
        self.create_widget()
        self.draw_widget()
        self.create_observer()


    def create_widget(self):
        """Create the interactive SVG mol widget"""
        d = rdMolDraw2D.MolDraw2DSVG(200,150)
        dm = Draw.PrepareMolForDrawing(self.mol)
        d.DrawMolecule(dm)
        d.TagAtoms(dm)
        d.FinishDrawing()
        svg = d.GetDrawingText()
        self.w = MolSVGWidget(svg=svg)

    def draw_widget(self):
        """Display the mol widget"""
        self.o_mol.clear_output()
        with self.o_mol:
            display(self.w)

    def on_atom_clicked(self, b):
        """Callback for reacting to atom clicked"""
        if b["new"] == "event_hack":
            return
        else:
            self.o_atomclicked.value = b["new"]

    def create_observer(self):
        """Create the observers that should react to the clicked event"""
        self.w.observe(self.on_atom_clicked, names="clicked_atom_idx")

app = AnnotateMol()
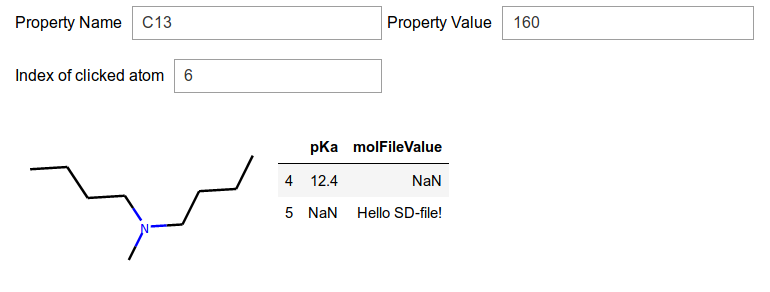
When we click on the atoms, the index text field is updated. It needs to be fairly precise and it can be difficult to hit the heteroatoms, so later we must look on how to increase the size of the clickable area. So now we can capture click events and couple it to actions in our python class. Lets link the action up to some methods that sets the the atom property with the specified name and a method that displays the molecules atoms and their properties using a small pandas dataframe. If the named property is set to nothing, the property is removed.
When we click on the atoms, the index text field is updated. It needs to be fairly precise and it can be difficult to hit the heteroatoms, so later we must look on how to increase the size of the clickable area. So now we can capture click events and couple it to actions in our python class. Lets link the action up to some methods that sets the the atom property with the specified name and a method that displays the molecules atoms and their properties using a small pandas dataframe. If the named property is set to nothing, the property is removed.
class AnnotateMol(object):
    def __init__(self, mol = Chem.MolFromSmiles("c1c([NH3+])cccc1CC(=O)O")):

        style = {'description_width': 'initial'}
        #Create the outputs and widgets
        self.o_mol = widgets.Output()
        self.o_molstring = widgets.Output()
        self.o_table = widgets.Output()
        self.o_atomclicked = widgets.Text(description="Index of clicked atom",
                                         #layout = widgets.Layout(width="100px"),
                                         style=style)
        self.t_propertyname = widgets.Text(description="Property Name", style=style)
        self.t_propertyvalue =widgets.Text(description="Property Value", style=style)
        #Make the GUI

        display(widgets.HBox([self.t_propertyname, self.t_propertyvalue]))
        display(self.o_atomclicked)
        display(widgets.HBox([self.o_mol, self.o_table]))

        #Set the mol
        self.mol = mol


    @property
    def mol(self):
        """Return the private mol"""
        return self._mol

    @mol.setter
    def mol(self, mol):
        """Set the private mol and initalize interactive SVG and update output widgets"""
        self._mol = mol
        self.create_widget()
        self.draw_widget()
        #self.show_molfilestring()
        self.show_atom_property_grid()
        self.create_observer()


    def create_widget(self):
        """Create the interactive SVG mol widget"""
        d = rdMolDraw2D.MolDraw2DSVG(200,150)
        dm = Draw.PrepareMolForDrawing(self.mol)
        d.DrawMolecule(dm)
        d.TagAtoms(dm)
        d.FinishDrawing()
        svg = d.GetDrawingText()
        self.w = MolSVGWidget(svg=svg)

    def draw_widget(self):
        """Display the mol widget"""
        self.o_mol.clear_output()
        with self.o_mol:
            display(self.w)

    def show_atom_property_grid(self):
        """Read all the atom properties into a pandas DF and display"""
        l = {}
        for i,a in enumerate(self.mol.GetAtoms()):
            a_dic = a.GetPropsAsDict()
            a_dic2 = {}
            for key, item in a_dic.items():
                if key[0] != "_": #Private props
                    a_dic2[key] = item
            if a_dic2:
                l[i] = a_dic2
        self.o_table.clear_output()
        with self.o_table:
            display(pd.DataFrame(l).T)


    def on_atom_clicked(self, b):
        """Callback for reacting to atom clicked"""
        if b["new"] == "event_hack":
            pass
        else:
            self.o_atomclicked.value = b["new"]
            atomidx = int(b["new"])
            #Update atom properties with the text values from the widgets
            atom = self.mol.GetAtomWithIdx(atomidx)
            name = self.t_propertyname.value
            value = self.t_propertyvalue.value
            if value == "": #If value is empty, remove property
                atom.ClearProp(name)
            else:
                atom.SetProp(name,value)
            self.show_atom_property_grid()

    def create_observer(self):
        """Create the observers that should react to the clicked event"""
        self.w.observe(self.on_atom_clicked, names="clicked_atom_idx")

#Instantiate the app with the default mol
app = AnnotateMol()
The mol can be accessed and the atom properties queried.
mol1 = app.mol
for atom in mol1.GetAtoms():
    print(atom.GetPropsAsDict().get("pKa"))
None
None
12.3
None
None
None
None
None
None
None
None
mol2 = Chem.MolFromSmiles("CCCCN(C)CCCC")
mol2.GetAtomWithIdx(4).SetProp("pKa","12.4")
mol2.GetAtomWithIdx(5).SetProp("molFileValue","Hello SD-file!")
app.mol = mol2

print(Chem.MolToMolBlock(app.mol))
     RDKit          2D

 10  9  0  0  0  0  0  0  0  0999 V2000
    0.0000    0.0000    0.0000 C   0  0  0  0  0  0  0  0  0  0  0  0
    1.2990    0.7500    0.0000 C   0  0  0  0  0  0  0  0  0  0  0  0
    2.5981   -0.0000    0.0000 C   0  0  0  0  0  0  0  0  0  0  0  0
    3.8971    0.7500    0.0000 C   0  0  0  0  0  0  0  0  0  0  0  0
    5.1962   -0.0000    0.0000 N   0  0  0  0  0  0  0  0  0  0  0  0
    6.4952    0.7500    0.0000 C   0  0  0  0  0  0  0  0  0  0  0  0
    5.1962   -1.5000    0.0000 C   0  0  0  0  0  0  0  0  0  0  0  0
    6.4952   -2.2500    0.0000 C   0  0  0  0  0  0  0  0  0  0  0  0
    6.4952   -3.7500    0.0000 C   0  0  0  0  0  0  0  0  0  0  0  0
    7.7942   -4.5000    0.0000 C   0  0  0  0  0  0  0  0  0  0  0  0
  1  2  1  0
  2  3  1  0
  3  4  1  0
  4  5  1  0
  5  6  1  0
  5  7  1  0
  7  8  1  0
  8  9  1  0
  9 10  1  0
V    6 Hello SD-file!
M  END